Basic HTML Version


479
IBRACON Structures and Materials Journal • 2012 • vol. 5 • nº 4
M. N. KATAOKA
|
A. L. H. C. EL DEBS
5.4 Boundary conditions
The boundary conditions adopted for the numerical simulation
was the restrictions of displacements on x and y in the base and
the top of the column to ensure the same test conditions. The
application of loads was performed near the end of the beam,
at 1580 mm from the connection. It was carried out force con-
trol. The representation of the boundary conditions is shown in
Figure 17.
5.5 Nonlinear analysis
The nonlinear analysis was carried out in the numerical simulation
with only consideration of physically nonlinear of the materials. To
solve the nonlinear system was adopted the secant method with
convergence criteria by rules of force and displacement.
Regarding the application of force, 557 load steps of 4 kN were
performed, 15 load steps by half-cycle for amplitude equal to 60
kN and 19 load steps for amplitude of 76 kN. It was chosen this
magnitude of steps to make the process faster, because there
were no problems with convergence.
6. Numerical results
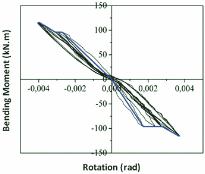
Figure 18 shows the bending moment
versus
displacement
curve obtained with the numerical simulation with cyclic load-
ing. According to this curve, to the negative bending moment
the stiffness is higher, it is important to tell that in two direc-
tions of bending moment the maximum effort applied was
115.20 kNm. The maximum rotated for positive direction was
0.004 rad and for negative 0.0037 rad. In accordance with
the envelope curve, the initial stiffness of the connection was
42552.23 kNm/rad.
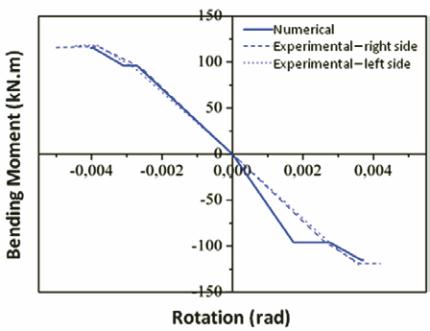
Based on the results, a good correlation was observed be-
tween numerical and experimental envelope curves, mainly to
the positive bending moment, as illustrated in Figure 19. The
initial stiffness presented by the numerical envelope curve was
42552.23 kNm/rad and the average between the sides of the
experimental model was 35342.52 kNm/rad. The numerical
stiffness was 17% higher than the experimental stiffness.
The numerical stiffness was higher than the experimental stiff-
ness because of the area of steel adopted in the simulation.
It is difficult to know which exact area of steel is contributing
to endure the efforts, thereby it was adopted the area corre-
sponding to the four bars more closer to the column, totaling
490 mm² (4 f 12.5 mm). This criterion was adopted in compli-
ance with the experimental results of deformation of steel bars.
For the bolts was considered the area of two elements, equal
to 400 mm ², for each row.
7. Parametric analysis
The parametric analysis was performed to identify important pa-
rameters in the design of the composite connection that would im-
prove behaviour.
7.1 Diameter of the bolts
Related to the diameter of the bolts, three diameters were used in
the parametric analysis, which were 12.5 mm, 20 mm and 25 mm.
The other connection characteristics were maintained the same,
as well as the properties of materials. The loading cycles applied in
the simulations were the same used in the simulation of the refer-
ence model even as in the test.
Based on the reference model stiffness, which was 42552.23 kNm/
rad, the model with bolts of 12.5 mm of diameter presented a stiff-
ness decrease at about 31%. When the diameter was increased,
in the case of 20 mm, 25% increase in diameter, the stiffness re-
mained the same. In the other case, to a diameter of 25 mm, the
stiffness increased 15%, as shown in Table 4. The representation
of the bending moment
versus
rotation curves and the envelope
curves are shown in Figure 20.
Figure 18 – Bending moment versus
rotation curve of the Numerical Model
Figure 19 – Experimental and numerical
envelope curves of the model 1

