Basic HTML Version


288
IBRACON Structures and Materials Journal • 2012 • vol. 5 • nº 3
Nanotechnology and Construction: use of nanoindentation measurements to predict macroscale elastic
properties of high strength cementitious composites
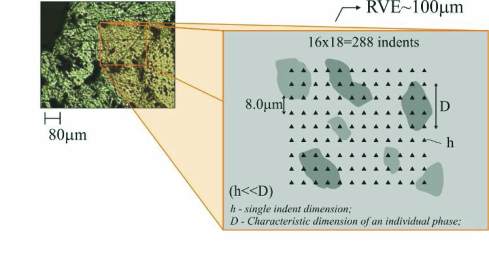
a sufficient content. Thus, it could be considered as a representa-
tive volume element (RVE) on the matrix level (level I) having the
dimension ~100 mm. Individual indent size (depth of penetration
h) was chosen to be h ≈ 200 nm, [19], so that the affected volume
under the indenter, which can be estimated as 3×h (i.e. ~600 nm),
was smaller than the characteristic sizes of inclusions to avoid
significant phase interactions. However, in the dense matrix of a
HPCC full exclusion of interactions can hardly be achieved since
it presents several phases of different stiffness. Due to surface
roughness, which cannot be further decreased by mechanical way,
[23], the indent size must be kept in hundreds of nm. The indent
size 100~300 nm also suits well the concept of grid indentation on
cement pastes, [19]. It can be assumed that hard quartz filler, with
maximum ~60 mm size, in larger volumes can also cause stiffening
of less stiff phases like C-S-H gels during indentation. The error
incorporated into the measurements can be roughly quantified by
FEM computation as 13~25%, [24]. Similar errors are incorporated
into measurement of stiff inclusions surrounded by a compliant
matrix, however their content is smaller and thus their influence
also decreases. It can be assumed that such errors are naturally
included in nanoindentation measurements and should be consid-
ered in the final comparisons.
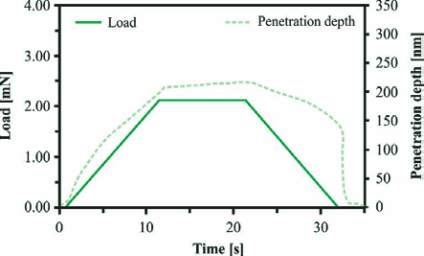
The nanoindentation loading regime contained loading at 12 mN/
min, holding for 10 seconds and unloading at 12 mN/min as shown
in Figure 4b. The holding period of 10 seconds with constant force
was added mainly to minimize creep effects on the elastic unload-
ing, [25].
The elastic modulus of the analyzed phase was determined ac-
cording to the Oliver-Pharr methodology, [10]. The analysis is
based on Eq.(1) to define the indentation (reduced) modulus:
(1)
S
A
E
r
p
b
2
1
=
(2)
max
hhh
P
d
d S
=
=
where S, which is defined by Eq.2, is the contact stiffness assessed
as a slope of the unloading branch at the maximum depth h
max
and
the peak load, A
c
is the projected contact area at the peak load, and
β is the geometrical correction factor introduced to correct the non-
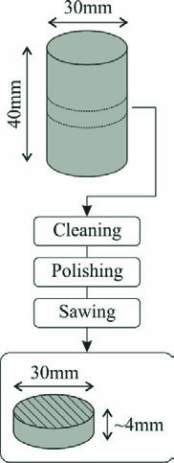
Figure 3 – Specimens for nanoindentation
test: initial and final configuration
Figure 4 – Nanoindentation tests: (a) Indentation grid, and (b) loading and penetration depth diagram
A
B

